DIY Self Care Products

Self care is super important – it can be a great mood booster, help your mental health, and give you new confidence! Self care is not selfish; we need time to take care of ourselves even when life feels too busy. People often prioritize other tasks or other people before themselves, putting their own needs on the back burner. Doing this can lead to an unhealthy view of yourself or can lead to a burnout. It is essential to take care of yourself in order to have the energy to support others and take on the rest of the world!
Since many self care products come with a hefty price tag, this week’s blog will go through a few things you can make at home to stay on budget! Not to mention, homemade products are always better since you know exactly what goes into them! No mysterious ingredients or chemicals, just old-fashion ingredients you can find in the pantry. Not only can making your own products save you a lot of money but it can also be very sustainable as you save from using plastic packaging and containers. Listed below are a few easy recipes for some great at-home self-care products!
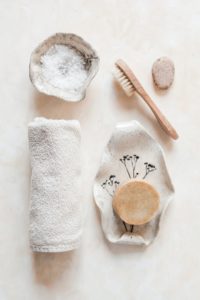
 Body Scrub
Body scrubs are a great product when your skin is a bit dry and flaky. Exfoliation keeps your skin looking vibrant, healthy, and smooth. Exfoliation should be done every few weeks to remove any build up of dead skin cells and allows your skin to fully absorb lotions or creams. Over-exfoliating can lead to dry or irritated skin, but a healthy amount stimulates collagen production for radiant skin! There are a variety of body scrub recipes, but one of the most popular is a sugar scrub. All you need to do is combine the following ingredients:
- ½ cup of brown or white sugar
- ½ cup of oil (coconut, olive, jojoba)
- Few drops of essential oil (lavender, eucalyptus, citrus)
Apply the body scrub in the shower so that you can immediately rinse and let the sugar mixture run down the drain.
Face Mask
Face masks are a great way to make an at-home treatment feel like a full spa treatment. There are countless face mask recipes made with a variety of ingredients you can find in the kitchen! One easy recipe is for a very moisturizing oatmeal mask. All you need to do is combine:
- 1/2 of hot water
- 1/3 cup of oatmeal
- 2 tablespoons of plain yogurt
- 2 tablespoons of honey
Apply a thin layer to face and neck and let sit for 10-15 minutes. You can slice a couple of fresh cucumbers for your eyes if you really want it to feel like you are at the spa! Rinse off your face to reveal fresh, smooth skin!
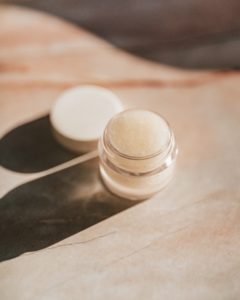
 Lip Balm
Dry lips can be annoying and stubborn to get rid of until you find a deeply moisturizing lip balm. Skip the plastic tubes and make your own with a natural, plant-based recipe! All you will need is:
- 2 tbps of soy wax (or shea butter / cocoa butter)
- 1 tbsp oil (coconut, almond)
- 10 drops of essential oil (lavender, geranium)
- Optional colour add-in: beet powder, butterfly pea powder
All you need to do is melt the wax or butter then add all other ingredients, stir, and let harden! Opt in for a more sustainable container such as a mini glass mason jar!
Body Lotion
Body lotion is a handy product to make at home since it becomes a frequent purchase, especially during the drier seasons. It can be hard to find a good lotion that matches your skin’s needs. Some lotions may feel greasy and sit on the skin rather than moisturize. It can be nice to make your own body lotion with natural ingredients and find the perfect combination for your skin! Try the recipe below and tweak it to your preference.
- 1/3 cup shea butter or cacao butter
- 2 tbsp coconut oil
- 2 tbsp hemp seed oil
- 1 tbsp avocado oil
- 10-15 drops of essential oil (lavender, lemon, peppermint)
First, you will need to melt down the butter before adding all other ingredients. Mix everything together then place in the freezer to set. Once it is semi-solid you can then whip the mixture until it forms peaks. Transfer mixture into a mason jar and enjoy your fluffy soft lotion!
 Hair Mask
Hair can be hard to maintain at times with frizz, dead ends, and dullness. After a long winter, your hair may need a little refresh with a moisturizing hair mask! Hair masks should be done at least once a month to lock in moisture and shine! Try the recipe below for a defrizzing, moisturizing hair mask:
- 1 ripe banana
- ½ avocado
- 2 tbsp coconut oil
- 1 tbsp honey
- Fresh lemon juice
Mix ingredients all together and coat your stands, leaving it sit for 15-20 minutes. Rinse off with cool water for best results!
There are plenty of recipes for self care products but these are just a few to get you started. We also had some tips from talented Maker, Amanda Bosiak, on soap making – which you can find here!
STEM Project for Kids: Ice Cream in a Bag

 STEM is an abbreviation for science, technology, engineering, and mathematics. There are many creative projects for kids that incorporate the educational component of STEM. Incorporating STEM into daily activities fosters learning, growth, and curiosity. Not only does it help kids learn new things but can also spark new interests, helping them to know themselves better which can be very helpful for the future!
Nowadays, it can be easy to hand kids a tablet or remote for the T.V but this makes it especially important to foster and support educational activities. With summer break right around the corner, it can be fun to plan a few different STEM activities to learn and play! One easy and fun activity is ice cream in a bag. Ice cream in a bag is a fun project which involves science and chemistry!
Supplies
- Measuring cups & spoons
- 1 tbsp sugar
- ½ cup whipping creams, milk, or half-and-half
- ¼ tsp vanilla extract
- ½ cup salt
- Ice cubes
- Sandwich bags
- Gallon-sized bags
- Towel
- Timer
 Procedure
First, you need to combine the sugar, whipping cream, and vanilla in one sandwich bag. Next, combine 4 cups of ice cubes and ½ cup of salt to a gallon-sized bag. Next, you will need to add the sandwich bag into the gallon-sized bag. Wrap a towel around the bag and shake the bag for approximately five minutes. Afterwards, add 4 cups of ice cubes to a new gallon-sized bag and transfer the ice cream sandwich bag into this one. Wrap a towel around and begin shaking again for approximately 5 minutes. Once you finish shaking the second time, the ice cream should be frozen and ready to enjoy!
Science
There is science behind this fun little project for the reason the ice reacts. Water is made up of fast-moving molecules but when temperatures drop, the molecules slow down and begin to line up in a pattern, thus forming ice crystals. As ice melts, the water droplets are still in a low temperature environment, slow-moving, and re-crystallizing.
There is a different reaction that happens between the bag of ice with salt added and the other bag with only ice. You will notice that the bag with ice and salt gets a lot colder and melts a lot faster. The reason for this is as the ice begins to melt, the water molecules mix with the salt. The salt interferes and does not allow the water molecules to create a newly crystallized patterns and therefore remain as water droplets. The rate of re-freezing is a lot lower in this bag although the temperature is colder. The reason for this is because the ice cubes are absorbing the heat available but the salt causes something called a ‘freezing depression’. During the freezing depression, it is possible for the bag to have a temperature of below 0 without actually freezing the water. The interference of the salt can change the temperature at which water freezes in its pure form to a temperature even colder than below 0.
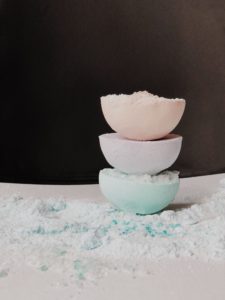
Bath Bomb DIY


Creating your own bath bomb is a fun project with a great outcome! Jumping into a hot bath after a long week is a great way to unwind and relax, but even better if you have all the bubbles, great smells, and beneficial properties! Bath bombs can be pretty pricy in stores but are fairly easy to make and very customizable.
Supplies:
- 1 cup baking soda
- ½ cup citric acid
- ½ cup Epsom salt
- ½ cup cornstarch
- Few drops colouring pigment
- 2 tbsp oil (coconut, almond, olive)
- 12 – 15 drops of essential oil
- Bath bomb mold
- Optional: dried flowers, sugar cake decorations
 Instructions
Begin by measuring out and mixing together all dry ingredients in a large mixing bowl. In a separate bowl, mix together all wet ingredients. Next, add the wet ingredients into the larger bowl of dry ingredients. Make sure to add slowly since the reaction of the citric acid causes the ingredients to begin fizzing. The last step is to add the mixture into the bath bomb mold. You can use a variety of molds such as a muffin tin, candy tray, or actual bath bomb molds that you can buy online. Let the bath bombs sit and dry in the mold for at least 24 hours before taking them out.
Essential Oils
When customizing your bath bomb, think about specific benefits you want. When steaming up your bathroom with a hot bath, it is a good idea to add essential oils with some beneficial properties. Not only do essential oils smell great but each aroma can provide different benefits such as stress relief, treat fungal infections, promote sleep, and balance mood. Aromatherapy has become very popular and is seen as a natural alternative medicine to support health and well-being. Here are a few examples of types of essential oils and their benefits:
- Lavender: known to relieve stress and promote relaxation
- Rose: reduces anxiety
- Lemon: reduces inflammation and boosts mood
- Peppermint: alleviates headaches
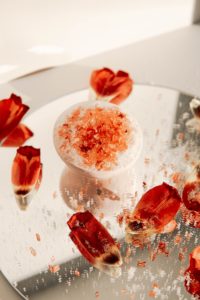
Other than scents, you can get super creative with bath bomb shapes, colours, and decorations! Try adding layers to the mold to make a fun multi-coloured bath bomb. Another way to get creative is to add dried flower petals such as roses, which will also have a great smell! You can also add exfoliating ingredients to your bath bombs such as coffee grounds or sugar! There are countless ways to get creative and have fun making new bath bomb recipes!
If you want some other self-care recipes check out last weeks blog here!
The Art of Photography

 Photography is an artform that anyone can learn more about and begin creating beautiful shots! If you only want to capture candid moments of life, you can stick with your smartphone but if you are planning on taking photography more seriously, you’ll want to invest in a DSLR or mirrorless camera. A DSLR or mirrorless camera will give you the opportunity to grow as a photographer and learn all there is to know about the art! There are a few things you can think of when setting up your shots, whether you are using your smartphone or a professional camera, such as composure, lighting, and focus.
For smartphone users:
Hold the square on the middle of the screen to lock your focus. Try to always keep the landscape line horizontal. Try to take photos without direct sunlight, otherwise the photo will be over exposed. There are plenty of apps, such as mobile Lightroom, to adjust the colours, contrast, and exposure of your photos in post-processing.
For DSLR & mirrorless camera users:
You can get a lot more playful and creative with a professional camera. Although in the beginning, you may shoot in ‘Automatic Mode’ while you get comfortable with your camera, eventually you’ll want to switch to ‘Manual Mode’. At first, it can be a bit overwhelming to learn all the buttons, switches, and lingo within shooting manual, but the picture will be a lot better once you get the hang of it. Professional photographers always shoot in manual mode because it gives them the creative freedom to set up the exact photo they are after. You will also want to shoot in ‘raw’ as it will give you the highest quality of photo which is better for post-processing.
There are many tutorials, workshops, and manuals that you can find online to help you figure out the workings of a camera. If you want to take your hobby to the next level, there are also full photography courses you can take online or in-person. The courses will not only teach you the functions of your camera but will also teach you how to set up and compose beautiful and creative shots! Taking the perfect shot is only one step, the next step is loading the photos to your laptop and begin the post-processing. Post-processing is an important step and will allow you to adjust the colour, exposure, highlights, and contrast. This can be done through many platforms such as Lightroom and Photoshop.
Getting Creative in the Kitchen

Along with arts and crafts, there are plenty of other ways to get creative, even in the kitchen! It’s easy to get stuck in a cooking rut, making meals that you’re good at and are easy to make. Cooking tasty meals is a pleasure and a great way to bring the family together! If the winter blues are hitting, why not bring some colour to your plate! Eating healthy and nutritious meals are a definite mood booster and will give you loads of energy to get moving about.
With more and more people realizing the benefits of a plant-based diet, this blog will list some fun and tasty vegetarian recipes to try at home! Not to worry if there are vegan eaters in the house as most of the recipes can be adapted to be vegan as well.
Buddha Bowl
Buddha bowls are a very balanced meal and an excellent way to get all of your macros. The recipe I like to use is listed below (use portions that suit you!)
Add about ½ cup of cooked quinoa to the bottom of your bowl. In sections, add the different chopped veggies and top with dressing of choice!
Ingredients:
Quinoa as the base
Roasted sweet potato
Chopped red onion
Julienned carrot
Chickpeas
Sliced tomatoes
Chopped cucumber
Topping: hummus, drizzled oil, salt & pepper
Stuffed Sweet Potato
Stuffed sweet potatoes are a great comfort food option since it is higher in carbs and loaded with flavour. Firstly, you’ll want to fully bake the sweet potato in the oven. Then toss some chickpeas in the oven, coated in oil, salt, pepper, and ginger. Once cooked, take everything out of the oven and add the chickpeas on top of the sweet potato. You can top with tahini, green onion, and sesame seeds.
 Ingredients:
Sweet potato in halves
Chickpeas
Green onion
Oil, salt, pepper, powdered garlic, sesame seeds
Tahini
Butternut Squash Risotto
This is a great meal to make on a cold day. It’s a delicious, healthy turn on a traditional risotto recipe. For added fiber and nutrients, make the risotto with brown rice rather than white rice. Cook the rice in white wine and vegetable stock, adding the liquid slowly and stirring constantly with a few basil leaves thrown in. Chop butternut squash into cubes and cook in a pan with chopped onion and garlic, seasoning with salt and pepper. Once everything is cooked, combine the butternut squash and some chopped spinach and stir everything together. Once placing the risotto in bowls, top with cilantro, salt, and pepper. 
Ingredients:
Butternut squash
Brown rice
White wine
Vegetable stock
Onion
Spinach
Garlic
Basil leaves
Oil, salt, pepper
Beetroot Salad
This is a great and healthy meal on the days you want something a bit lighter. Add mixed green, feta cheese, pumpkin seeds, and roasted beetroot with a drizzle of oil, salt, and pepper! Always make sure to add some carbs and protein to your salads to make sure they have enough sustenance to fill you up!
Ingredients: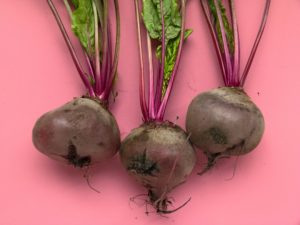
mixed greens
beetroot
pumpkin seeds
feta cheese
Topping: oil, salt, pepper
Falafel Sliders
Falafels are extremely tasty and super easy to make! Falafel is a Middle Eastern dish and is made by a mixture of chickpeas, herbs, and spices. You’ll want to use dry chickpeas rather than canned chickpeas and the skins should be removed after they are cooked. The chickpeas need to be mashed and mixed with a blend of herbs and spices to bring out the flavour. Once the falafel patties are finished, add them to a bao bun with some kale, shredded carrot, salt and pepper for a delicious dish!
Ingredients:
Falafel
Bao bun
Kale
Shredded carrot
Tahini
Vegetarian Chili
Chili is a winter favourite, packed with nutrients and flavour! You’ll want to start off by cooking the aromatic ingredients first which is the onion, garlic, celery, and carrots. Once these veggies are cooked, you can add the spices until fragrant. Then you can combine and stir all other ingredients in, turn down the heat and let simmer until ready.
Ingredients:
Onion, celery, carrot, garlic
Red bell pepper
Canned diced tomato
Black beans & pinto beans
Vegetable broth
salt & pepper, chili powder, ground cumin, paprika,
oregano, basil leaf
Although these are only a few recipes, there are so many recipes available on the internet whether through blogs of videos on YouTube! Each of the six recipes here can be modified based on your own preferences. Trying out new recipes in the kitchen is another great way to clear the mind and feel creative!
Best Outdoor Activities for Spring

After a long and cold winter, most of us are eager to get outside and play. Getting outside is very important for our mental and physical health and should therefore be made a priority!
 Scavenger Hunt
Scavenger hunts are a great way to keep busy and spend time outside! It can be fun to make the hunt for your family and friends, making it as easy or hard as you want! If you haven’t made a scavenger hunt before, try getting outside for a walk first to figure out what sort of objects are in your area – certain types of leaves, rocks, flowers, animals, and overall environment! The most sustainable way to do the scavenger hunt is to get everyone to take pictures rather than picking and collecting.
Hiking
Another great way to get outdoors is to explore while hiking! We are lucky enough to call this vast country of wilderness our home, why not get out and see it? Hiking is great exercise for strength and endurance – it provides many benefits for overall health. There are countless hikes to choose from in Saskatchewan from easy to moderate to difficult. Listed below are some of the top regions to hike in Saskatchewan:
- Meadow Lake Provincial Park
- Cypress Hills Interprovincial Park
- Prince Albert National Park
 Saskatoon Farmers’ Market
One of the great things about the spring and summer is all the local produce, canned goods, baked goods, and a variety of other goodies. The Saskatoon Famers’ Market is running this year both virtually and in person. The Farmer’s Market is a great way to support our local people, network, and feel part of the community!
Picnic
An easy activity to enjoy the outdoors is picnicking! Picnics are simple but can be a nice and memorable experience. It can be a very fun experience to prepare your picnic basket and head out to an amazing location to enjoy a meal. Try heading out to higher grounds and watch the sun go down as you indulge in some tasty finger foods!
 Camping
Camping is definitely one of the best outdoor experiences for people who love the wilderness. Each camping experience is unique and completely customizable based on gear, timeframe, and comfort level. Camping is not only an outdoor escape but is also educational as you learn to build fires, make food with minimal sources, and discover the surrounding flora and fauna.
Spring Crafts

Spring is in full bloom! The weather is warming up, birds are singing, grass is getting greener, and the winter cold has washed away. Spring is a fresh start and a perfect time to get busy with some fun crafts! The following crafts are great for adults but can be adjusted to a simpler version for kids as well!
 Painted Mason Jars / Flower Vases
Painting is always a fun project, but have you ever tried painting a mason jar or flower vase? This can be as simple or as detailed as you would like and is also very kid friendly! Grab some mason jars or flower vases, a range of paint colours, brushes, and get busy! A nice design is to first paint the jar white as a base, let it fully dry, and then add a design on top! Try playing around with spring colours such as yellow, pink, and green. When you are all finished, take a walk to go pick a bouquet of wildflowers to put in your new vases!
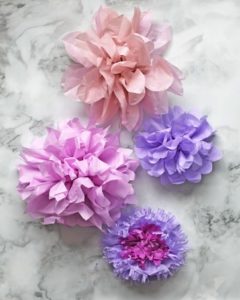
Tissue Paper Flowers
If you didn’t get a chance to find some fresh wildflowers for your new vases, why not try to make some cute tissue paper flowers that will last much longer? Tissue paper flowers are simple to make and are a nice touch to add a pop of colour to your home for spring! All you will need are pipe cleaners and tissue paper! Simple how-to below:
- Layer about 8-12 pieces of tissue paper of either the same colour or a couple colours that go well together
- Using a cup, trace a circle out onto the top sheet of tissue paper and cut it out
- Cut two small holes in the center of the layered tissue paper
- Take a pipe cleaner, put in through one hole and loop it through the other
- Lastly, you just need to scrunch up each layer of the tissue paper, going from the top to bottom
- You can also create leaves with extra pipe cleaners
 Nature Clay Impressions
Clay impressions are a fun and simple little project but make for beautiful decorations and memories. Before you get started, go for a hike or walk through the outdoors and pick some leaves or plant materials that catch your eye. Be mindful and do research before you pick something – you want to make sure you are not picking a protected flower or plant.
To make the clay, you will need the following:
- Flour
- Salt
- Water
Mix together equal parts flour and salt – add teaspoons of water and continue mixing until a soft, smooth dough is formed. Grab a piece of the mixture and roll in your hands to form a ball. Put the ball down on a sheet of baking paper with flour sprinkled over. Use a rolling pin to roll the dough to at least ¼ inch thickness. At this point, you can create any shape you’d like using a cooking cutter.
Once you have prepped your clay to the thickness and shape you want, take your flower or leaf and press it into the clay mould. After, lift the flower or leaf to reveal a nice pattern on the clay. Allow the clay to set by leaving it out for approximately two days in a well-ventilated room. Alternatively, you can bake the clay at 100 degrees for approximately 3 hours. Once the clay impression is dry, you can leave as is or add some paint!
Faux Stained Glass
Stained glass is beautiful but can be fairly expensive so why not try your hand at a faux stained-glass project? There are a variety of ways to make faux stained glass, but using acrylic paint allows for the most intense colour results.
Supplies:
- Acrylic paint
- 1 bottle white glue / 1 bottle clear glue
- 8×10 photo frame (or other sheet of glass)
- Craft blade
- Painter’s marker (black tip)
- Super glue
- Clear acrylic spray sealant
- Paint brush
Before you get started, you will need to find a template that you want to use. If it is your first time, try going for a simpler design. Put the printed template underneath the glass and outline the picture with the black painter’s marker straight onto the glass. Once you’ve finished outlining, let the paint dry overnight. The next day, your design will be ready for paint. Mix one colour at a time – with 3 tablespoons of clear glue and a few drops of acrylic paint. Make sure the paint is thick so that the colours show up vibrantly.
Backyard Renovations for Spring

Spring is in full swing which means it is the perfect time for a backyard makeover! Upgrades to your backyard don’t need to cost an arm and a leg but can be very budget friendly. There are a few things you can do to make your space look brand new!
 Patio
Patio
A patio space is the outdoor gathering place for family and friends to share a meal and enjoy each others company. Patios are extremely customizable are can be a fun little design project. To make your patio space more inviting, try throwing some colourful pillows onto the seats. To save extra money, you can stitch together your own throw pillows!
A patio space does not only need to be a table and chairs but can also be created into a lounge and relaxation place. Try adding an outdoor rug, swing chair, hammock, and mood lighting to create something more dynamic. If you create a space that you are proud of, it can inspire you to spend more time outdoors! Laying in a crochet hammock, reading a book, with the gentle summer breeze is a great stress relief and perfect way to take in the freshness of summer!
Walking Path
Walking paths are a simple but cute addition to a backyard space. The path can lead from the back deck to the gate or other features within your backyard. Although you can purchase stepping stones from any home shop, it can be much more fun to make your own path by hand! There are many budget friendly materials to use such as brick, pallet wood, mulch, and gravel. Otherwise, you could try making your own stepping stones out of concrete!
 Garden
A garden is a great way to bring some life into your backyard space. Bringing plants into the mix creates an inviting atmosphere. It is also a way to get yourself moving outdoors as it requires quite a bit of maintenance. There are many options for what to grow and can be anything from flowers, to herbs, to vegetable plants.
If you are looking for something a bit lower maintenance, you can install perennials. Perennials are plants that live more than two years are generally come back during the spring or summer. Some ideas for perennials are roses and peonies. If you want the benefit of using perennials for your cooking, try installing rhubarb, asparagus, or chives!
Firepit
A summer spent sitting around a fire is a good summer! The evenings spent with friends or family around a cozy fire, roasting marshmallows, and looking up at the stars make for great summer memories. There are many different options for firepits, but it can be another fun project to DIY, not to mention much cheaper! One of the most popular is to create a circle with stacked bricks and gravel as the base.
Maker Spotlight: Michael Kowalski

Michael Kowalski is a Maker from Ontario and a founding member of KWArtzLab, a not for profit Maker society. Located in the Waterloo region, KWArtzLab wishes to provide tools, community connections, and learning opportunities for Makers in the area.
Beginning of KWArtzLab
Michael developed this space for creators lacking the means and proper space to create! KWArtzLab is operated solely by volunteers and there are no hired employees or staff. Therefore, it is not freely open to the public and people must join as a member. Members need to pay a small fee and will then receive a key card with 24-hour access to the shop. To govern the workshop, there is an election that takes place each year. At the annual meeting, seven directors are elected, and are meant to serve for a term of 1 year.
 Workshop
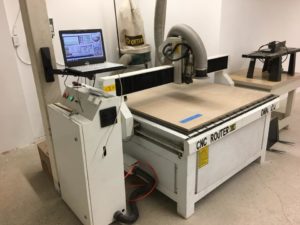
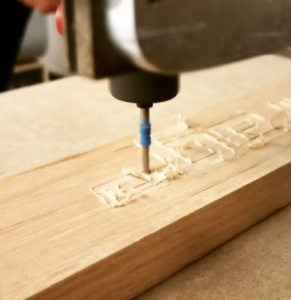
The workshop has a variety of tools available such as 3D printers, an electronics workbench, and much more! There is a section available for laser cutting which includes a 2×3 ft. bed which can cut materials such as plywood, acrylic, and fabric. Another section is made for fabric arts which includes heavy duty sewing machines, a serger, and a CNC embroidery machine! Lasty, there is also a ‘heavy lab’ where Makers can work with wood and metal working tools such as lathe, mitre saw, bandsaw, drill press, MIG Welder, and a CNC router.
Events
During normal times, KWArtzLab holds weekly events and meetups for Makers to create and learn from each other. An example of the events held are the robot club meetups, oil/lube/filter workshops, and open nights for the public! Adapting to the times, KWArtzLab now has many virtual events and workshops available. Still, the team is hoping to hold their first post-COVID meetup at the beginning of July!
 Community
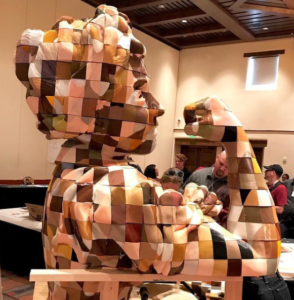
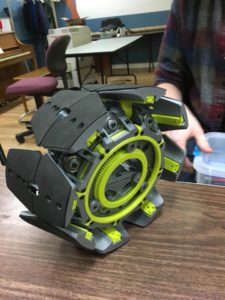
There have been many interesting projects made at the KWArtzLab workshop with talented Makers from all over Ontario. Projects have included a massive 3D printed statue, hex tile murals, and furniture. This is a place where there is a balanced mixture of science, technology, mechanics, and art! People come to the KWArtzLab full of ideas and inspiration to create, thriving off the enthusiastic environment. People can feel free to create as the please in a positive environment, free of judgement, with the support of their peers!
If you are interested in learning more, check out the KWArtzLab website here!
Maker Spotlight: Nutrien Wonderhub

Nutrien Wonderhub is a local organization and museum which focuses on intergenerational creativity! The purpose behind the organization is to foster curiosity and lifelong learning through interactive and hands-on exhibits and programs. The Wonderhub museum is located on Spadina Crescent in Saskatoon. The mission of the organization is to combine play and education by bridging the gap between school and home!
Mission and Values

The values of Wonderhub focus on curiosity, child-centricity, and sustainability. They wish to make the establishment more than just a museum but an inclusive meeting-place. They want to use our natural wonder and curiosity as a catalyst for educational experiences. Wonderhub offers both in-house and outreach educational programs, made for playful learning!
“The Nutrien Wonderhub community extends far beyond the walls of our home at the Mendel. Through outreach programming, affiliations with community-focused events and initiatives, and our own signature events, we continue our commitment to creating interactive, inclusive opportunities to play, learn, and grow.” – Nutrien Wonderhub, 2021
History
Nutrien Wonderhub first began back in 2002 when a group of passionate volunteers came together to create the Children’s Discovery Museum. Up until 2009, the museum was mobile, with volunteers working with supplies and educational material out of their van. In 2009, they were able to secure a space at the Saskatoon Market Mall and quickly became a mecca for families with young children. The following years showed much success with hosting international travel exhibits, debuting the Kid Approved capital campaign, and obtaining the fundraising goal of $14.5 million to help build a world-class children’s museum. Now, the museum is up and running for the general public. The museum offers general admission or memberships for those who wish to visit more often. There are both individual and family memberships which offers great discounts, special pricing on camps and programs, and access to private events.
Museum & Exhibits
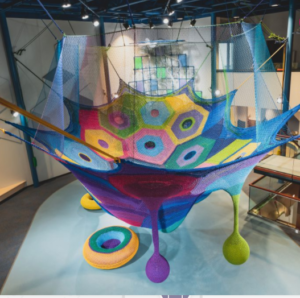 The museum offers exhibits, workshops, and a variety of rooms. There is also a café with quick grab & go snacks and gift shop on site. The gift shop has a selection of toys and learning tools available for purchase so you can keep learning at home!
There are three levels to the museum with wide variety of exhibits, each one offering unique displays and educational toys. One of the most popular exhibits is the ‘Cosmic Commotion’ which is the only permanent installation from internationally acclaimed artist Toshiko Horiuchi in North America. The installation is a giant crocheted structure where kids can climb about, popping up in different pods. The other exhibits allow guests experiment with sound, light, colour, wind, and art. The exhibits have all been created with a purpose, whether it be to trigger sensory development, imagination, motor skills, collaboration, or creativity. Each exhibit is a fun experience not only for the children but for parents too! Wonderhub believes in a method where the child leads the way, without timeline, which guarantees a new and enjoyable experience at each visit!
Programs, Classes, Workshops, and Camps
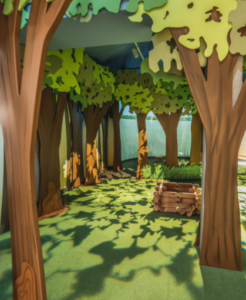
Along with the exhibits, there is also a workshop, create spaces, and a gathering place which gives guests the opportunity to get involved and attend different programs. The workshops include 3D printing, laser cutting, drilling, and sanding. The create spaces are made for guests to collaborate and explore creativity. The gathering place is a tree-lined space which is used for groups to come to share stories and experiences.
There is a selection of eight different programs available from Pre-K all the way to Grade 6. Each program offers an interesting approach to creative learning and experience. One of the programs called ‘Rock On’, offered for Grades 3-6, focuses on rock formation and erosion to learn how landforms are shaped. Another program called ‘Clang! Bang! Boom!’ explores the science of sound by introducing pitch, volume, sound waves, and vibrations. This program is offered for Pre-K to Grade 4 and gives children the opportunity to create their own sound makers.
The classes and workshops offered incorporate STEAM learning to encourage a balanced education. For those of you new to this concept, STEAM learning is a method that focuses on a blend of science, technology, engineering, the arts, and mathematics. Summer camps are also up and running which allows campers to experience both the indoors and outdoors of what Wonderhub has to offer! The summer camps are made for kids ages 5-9 and are offered as either day camps or week-long camps. The camps are a great way to keep kids busy, give them a chance to make new friendships, and gain independence in a fun, open, and educational environment. Throughout the camps, campers will get to explore the museum, work together on projects, and interact with the hands-on exhibits and workshops. Each workshop, class, camp, and program are meant to be inclusive and celebrate community!
If you are interested in learning more about Nutrien Wonderhub, check out their website here!
 Body Scrub
 Lip Balm

 Hair Mask
 Procedure
 Instructions


 Scavenger Hunt
 Saskatoon Farmers’ Market

 Camping
  Painted Mason Jars / Flower Vases
 Nature Clay Impressions
 Patio
Patio 
 Garden
 Workshop
 Community