Spring Crafts

Spring is in full bloom! The weather is warming up, birds are singing, grass is getting greener, and the winter cold has washed away. Spring is a fresh start and a perfect time to get busy with some fun crafts! The following crafts are great for adults but can be adjusted to a simpler version for kids as well!
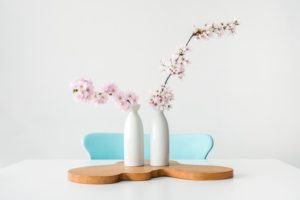
 Painted Mason Jars / Flower Vases
Painting is always a fun project, but have you ever tried painting a mason jar or flower vase? This can be as simple or as detailed as you would like and is also very kid friendly! Grab some mason jars or flower vases, a range of paint colours, brushes, and get busy! A nice design is to first paint the jar white as a base, let it fully dry, and then add a design on top! Try playing around with spring colours such as yellow, pink, and green. When you are all finished, take a walk to go pick a bouquet of wildflowers to put in your new vases!
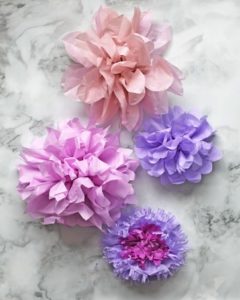
Tissue Paper Flowers
If you didn’t get a chance to find some fresh wildflowers for your new vases, why not try to make some cute tissue paper flowers that will last much longer? Tissue paper flowers are simple to make and are a nice touch to add a pop of colour to your home for spring! All you will need are pipe cleaners and tissue paper! Simple how-to below:
- Layer about 8-12 pieces of tissue paper of either the same colour or a couple colours that go well together
- Using a cup, trace a circle out onto the top sheet of tissue paper and cut it out
- Cut two small holes in the center of the layered tissue paper
- Take a pipe cleaner, put in through one hole and loop it through the other
- Lastly, you just need to scrunch up each layer of the tissue paper, going from the top to bottom
- You can also create leaves with extra pipe cleaners
 Nature Clay Impressions
Clay impressions are a fun and simple little project but make for beautiful decorations and memories. Before you get started, go for a hike or walk through the outdoors and pick some leaves or plant materials that catch your eye. Be mindful and do research before you pick something – you want to make sure you are not picking a protected flower or plant.
To make the clay, you will need the following:
- Flour
- Salt
- Water
Mix together equal parts flour and salt – add teaspoons of water and continue mixing until a soft, smooth dough is formed. Grab a piece of the mixture and roll in your hands to form a ball. Put the ball down on a sheet of baking paper with flour sprinkled over. Use a rolling pin to roll the dough to at least ¼ inch thickness. At this point, you can create any shape you’d like using a cooking cutter.
Once you have prepped your clay to the thickness and shape you want, take your flower or leaf and press it into the clay mould. After, lift the flower or leaf to reveal a nice pattern on the clay. Allow the clay to set by leaving it out for approximately two days in a well-ventilated room. Alternatively, you can bake the clay at 100 degrees for approximately 3 hours. Once the clay impression is dry, you can leave as is or add some paint!
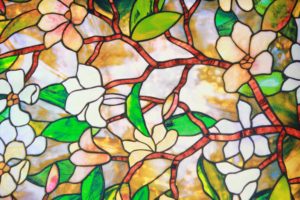
Faux Stained Glass
Stained glass is beautiful but can be fairly expensive so why not try your hand at a faux stained-glass project? There are a variety of ways to make faux stained glass, but using acrylic paint allows for the most intense colour results.
Supplies:
- Acrylic paint
- 1 bottle white glue / 1 bottle clear glue
- 8×10 photo frame (or other sheet of glass)
- Craft blade
- Painter’s marker (black tip)
- Super glue
- Clear acrylic spray sealant
- Paint brush
Before you get started, you will need to find a template that you want to use. If it is your first time, try going for a simpler design. Put the printed template underneath the glass and outline the picture with the black painter’s marker straight onto the glass. Once you’ve finished outlining, let the paint dry overnight. The next day, your design will be ready for paint. Mix one colour at a time – with 3 tablespoons of clear glue and a few drops of acrylic paint. Make sure the paint is thick so that the colours show up vibrantly.
Maker Spotlight: Nutrien Wonderhub

Nutrien Wonderhub is a local organization and museum which focuses on intergenerational creativity! The purpose behind the organization is to foster curiosity and lifelong learning through interactive and hands-on exhibits and programs. The Wonderhub museum is located on Spadina Crescent in Saskatoon. The mission of the organization is to combine play and education by bridging the gap between school and home!
Mission and Values
The values of Wonderhub focus on curiosity, child-centricity, and sustainability. They wish to make the establishment more than just a museum but an inclusive meeting-place. They want to use our natural wonder and curiosity as a catalyst for educational experiences. Wonderhub offers both in-house and outreach educational programs, made for playful learning!
“The Nutrien Wonderhub community extends far beyond the walls of our home at the Mendel. Through outreach programming, affiliations with community-focused events and initiatives, and our own signature events, we continue our commitment to creating interactive, inclusive opportunities to play, learn, and grow.” – Nutrien Wonderhub, 2021
History
Nutrien Wonderhub first began back in 2002 when a group of passionate volunteers came together to create the Children’s Discovery Museum. Up until 2009, the museum was mobile, with volunteers working with supplies and educational material out of their van. In 2009, they were able to secure a space at the Saskatoon Market Mall and quickly became a mecca for families with young children. The following years showed much success with hosting international travel exhibits, debuting the Kid Approved capital campaign, and obtaining the fundraising goal of $14.5 million to help build a world-class children’s museum. Now, the museum is up and running for the general public. The museum offers general admission or memberships for those who wish to visit more often. There are both individual and family memberships which offers great discounts, special pricing on camps and programs, and access to private events.
Museum & Exhibits
 The museum offers exhibits, workshops, and a variety of rooms. There is also a café with quick grab & go snacks and gift shop on site. The gift shop has a selection of toys and learning tools available for purchase so you can keep learning at home!
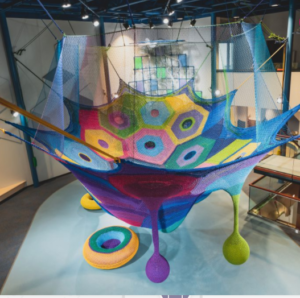
There are three levels to the museum with wide variety of exhibits, each one offering unique displays and educational toys. One of the most popular exhibits is the ‘Cosmic Commotion’ which is the only permanent installation from internationally acclaimed artist Toshiko Horiuchi in North America. The installation is a giant crocheted structure where kids can climb about, popping up in different pods. The other exhibits allow guests experiment with sound, light, colour, wind, and art. The exhibits have all been created with a purpose, whether it be to trigger sensory development, imagination, motor skills, collaboration, or creativity. Each exhibit is a fun experience not only for the children but for parents too! Wonderhub believes in a method where the child leads the way, without timeline, which guarantees a new and enjoyable experience at each visit!
Programs, Classes, Workshops, and Camps
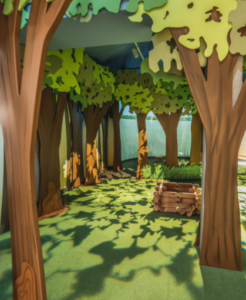
Along with the exhibits, there is also a workshop, create spaces, and a gathering place which gives guests the opportunity to get involved and attend different programs. The workshops include 3D printing, laser cutting, drilling, and sanding. The create spaces are made for guests to collaborate and explore creativity. The gathering place is a tree-lined space which is used for groups to come to share stories and experiences.
There is a selection of eight different programs available from Pre-K all the way to Grade 6. Each program offers an interesting approach to creative learning and experience. One of the programs called ‘Rock On’, offered for Grades 3-6, focuses on rock formation and erosion to learn how landforms are shaped. Another program called ‘Clang! Bang! Boom!’ explores the science of sound by introducing pitch, volume, sound waves, and vibrations. This program is offered for Pre-K to Grade 4 and gives children the opportunity to create their own sound makers.
The classes and workshops offered incorporate STEAM learning to encourage a balanced education. For those of you new to this concept, STEAM learning is a method that focuses on a blend of science, technology, engineering, the arts, and mathematics. Summer camps are also up and running which allows campers to experience both the indoors and outdoors of what Wonderhub has to offer! The summer camps are made for kids ages 5-9 and are offered as either day camps or week-long camps. The camps are a great way to keep kids busy, give them a chance to make new friendships, and gain independence in a fun, open, and educational environment. Throughout the camps, campers will get to explore the museum, work together on projects, and interact with the hands-on exhibits and workshops. Each workshop, class, camp, and program are meant to be inclusive and celebrate community!
If you are interested in learning more about Nutrien Wonderhub, check out their website here!
Upcycling Old Clothing

Upcycling old clothing is not only giving a second life to pieces you may not wear anymore but is also a great way to be sustainable! Some pieces may be too used and old that they cannot be donated and so the only option would be to throw them out or repurpose them. With the negative impacts of the fast fashion industry, it is extremely important to cut down on waste. Why not take the opportunity indoors to create a more sustainable closet? Upcycling is a great way to get creative and craft during cold winter days!
Listed below are some fun and creative upcycled clothing ideas:
1. Dress shirt into dress 
If you have a husband that has a lot of extra old dress shirts, why not pull out the sewing equipment and turn them into cute dresses for yourself. Cinch the waist and wear overtop a pair of black leggings with boots for a perfect new winter look.
2. Tie dye
Tie dye is back! Tie dying some old clothing is a fun afternoon craft to make some new styles with old t-shirts or sweaters. Go for light pastel colours, perfect for spring!
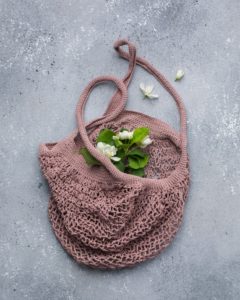
 3. Reusable bags
If you have a pair of old jeans, sweaters, or shirts – you can make some new reusable bags for your grocery shopping! Reusable bags are very easy to sew together and can be combined with materials from a few different sources.
4. Sweater cardigan
Sweaters can eventually lose shape after wear and washing. A great way to update a worn-out sweater is to turn it into a cardigan! Grab some scissors and cut up the middle, sewing the open fabric shut.
5. A bit of lace
Adding a bit of lace can go a long way. Lace is a great touch to update an old t-shirt, long sleeve, or tank. You can add lace trimming on the bottom, on the sleeves, or up the sides.
6. Off shoulder shirt
Off shoulder shirts and sweaters are super trendy at the moment! If you have a shirt or sweater that you don’t wear anymore, grab some scissors and sewing material to cut out the neck and make something off shoulder. You can make it off one shoulder or both!
7. Sherpa jacket
If you have an old denim jacket that you don’t wear anymore, why not add some faux fur inside to make it into an updated cozy fall jacket. All you’ll need is some faux fur material and fabric glue!
Maker Spotlight: Amanda Brown

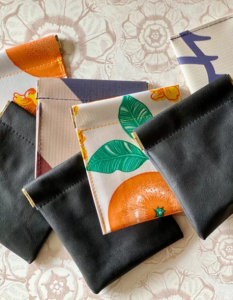
Amanda is a local designer in Saskatoon with a sustainable label called Scarlett Dahlia which launched back in 2013. Since she was a young girl, she was passionate about designing clothing, accessories, and keeping herself busy with different creative projects. As an adult, she continues flourishing her artsy side and chasing a few different creative endeavours! One of the biggest projects Amanda is working on is her business, Scarlett Dahlia. She designs and creates all pieces in her home studio and has come up with a range of products such as wallets, scarves, and shawls. Along with the clothing brand, Amanda is a multi-talented visual, textile, and makeup artist. She has a deep-rooted connection and understanding of sustainable slow fashion, implementing her beliefs into all aspects of her life and business development.
 Sustainable Focus
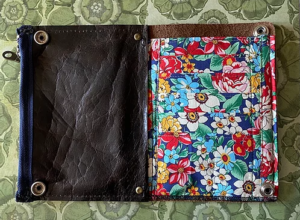
The roots to the brand, Scarlett Dahlia, is based on a sustainable business plan, having a small-impact and sticking as close to zero-waste as possible. Amanda strongly believes in re-purposing and re-using old materials to create new, updated pieces. She is also mindful of the pieces she is repurposing and mainly uses materials that would otherwise end up in the landfill. She uses materials from a variety of sources such as old clothing, banner vinyl, leftover leather, and yarn. Each piece of Scarlett Dahlia is one-of-a-kind and uniquely handmade, using a variety of colours and patterns.
“My morals are simple: choose materials that will have as little negative impact on the earth as possible, buy local and support companies who operate and trade fairly and ethically, and then use 100% of that material.”
Fast Fashion
Being hyperaware of the fast fashion industry, Amanda wishes to use her brand as an example that the fashion industry does not need to be so wasteful. In the past, it was not uncommon to use scrap material to repurpose old garments. It wasn’t until the early 2000s that the fast fashion industry boomed. Over the past few years, it has gotten worse with more people wanting the latest trends that rotate at an extreme rate. Social media, such as Instagram, has created a world where many people want to continuously have new clothes per post as well as staying up to date with the latest trends.
Based on the quick rotation of trends, people turn to cheap, low-quality clothing. Fast fashion has become engrained into first world countries and the problem lays with people not seeing the full extent of impact with their purchases. It is important for information like this to be easily accessible to the public and for people to know the negative impacts they contribute based on their purchases. With brands like Scarlett Dahlia, people now have the option to opt for slow fashion without breaking the bank! Not to mention, smaller designs offers both quality and uniqueness compared to mass produced items that are all exact copies which millions of people have access to purchasing.
 The Zero-Waste Process
For those of you new to this concept, zero-waste is simply a principle to cut out any form of waste from start to finish. The focus is to resource materials and use every piece rather than throwing anything out. This is an extremely important initiative in a world with a population exceeding 7.8 billion people. The term came to light in the 2000s when the wastefulness of today’s society and the colossal amount of waste in landfills was acknowledged across the globe.
Waste is one of the worst environmental impacts in our current world. Over-consumerism has created a new global problem and we see it in our landfills. Some of the problems associated with waste is the contribution to greenhouse gas emissions, soil contamination, and water contamination which all contribute to the climate crisis. The fast fashion industry is one of the largest contributors to waste, globally.
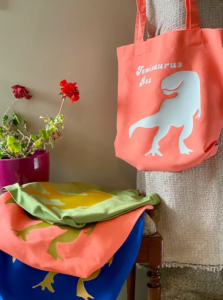
To make her brand ‘zero-waste’, Amanda mainly works with scrap offcuts, left over from other products, and uses them to make her new pieces. When making wallets, Amanda only uses a small amount of fabric and the leftover fabric is then cut up and weaved into rugs. Any tiny bits of leftover material after this gets cut into even smaller pieces and is used for stuffing. Any woven goods are 100% zero-waste and made completely of natural fibers and any leftover yarn from this is used to make different designs using accent stripes. All the packaging also comes from either re-usable, recyclable, or compostable materials. From beginning to end, each step is taken with the utmost mindfulness to achieve sustainability.
Amanda is both passionate and talented with her business and other creative endeavours! She is another example of just how creative our local community really is! To read more about Scarlett Dahlia or shop the website, click here!
To read more on our other Makers, click here!
Crafts at Home

Crafting is a great way to spend time, especially when stuck inside the house! There are unlimited projects you can work on that don’t need a bunch of new supplies. Enjoy getting creative with your family and spend the afternoon keeping busy! Making crafts not only keeps the hands busy but the mind as well. Sometimes, it is important to just let your mind focus on other, less important things if you’re feeling a bit stressed, anxious, or overwhelmed. Staying creative is important as it can help increase mental health, motivation, and inspiration.
There are plenty of household items you can use for crafting, such as string, old clothing, old frames…etc. Not to mention, many of these projects upcycle old items that might have otherwise gone to waste so it’s also sustainable!
Listed below are a few fun projects to try with items you can find at home!
1. Reusable Bags
Making reusable bags is fun and handy for your trips to the grocery store! You can sew or hand-stitch the bags using a variety of materials, such as an old t-shirt! Instead of choosing paper or plastic, make of few of these and have them handy in your vehicle whenever heading to the store!
2. Vases
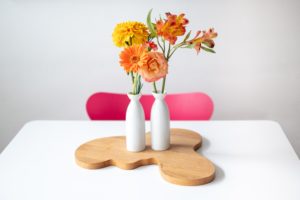
Updating vases is a great way to refresh old vases you have in your house. Grab the collection of vases, some paint, chalk, stencils, or anything else to add a creative touch! You can upcycle these vases to add a new and modern aesthetic to your home. Try stenciling new designs or bright paint colours to be bold! Afterwards you can either leave the vases empty as art piece in the house or get creative with what goes into them!
3. Newspaper Plant Pots
A great at-home project that pays off is starting your own herb garden! You can start off by using old newspaper to create plant pots, fill them up with soil, and plant a couple seeds! You can grow a wide variety of plants indoors, including cilantro, green onions, and even avocado!
Check out some Pinterest idea here!
4. Wreaths
Wreaths are a super fun afternoon activity with endless possibilities! You can make a creative wreath out of old clothing and dish cloths or you can go with something more simple. There are unlimited ideas on sites like Pinterest.
 5. Bracelets
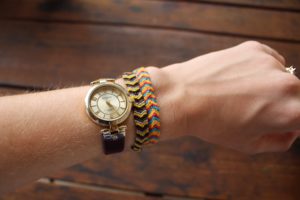
There are a lot of different bracelet patterns that can be found on the internet and all you really need is some string! There are unlimited possibilities when it comes to making bracelets, or any jewelry for that fact! Try out different tying patterns, string colours, and beads! Bracelets are fun and easy project because they are not too time consuming.
101 Tutorial: Jewelry Making

Hugo Jamain is a talented jeweler, making handmade pieces in his shop out of sustainable materials that would otherwise end up in the landfill. Check out our blog from a few weeks ago on his brand, STYX. For this week’s blog, Hugo decided to get a little more involved in the details on the jewelry making process for a 101-tutorial guide for anyone that wants to try their hand at making their own jewelry.
 Step 1: Finding the Materials
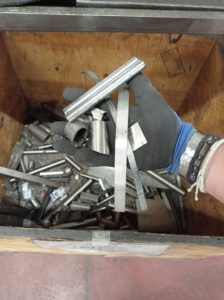
Firstly, Hugo goes through boxes of scrap metals and searches for materials that he can use, such as stainless steel and brass. He mainly uses stainless steel because it’s high-quality and is one of the strongest metals.
Stainless steel is a very common metal used to make products like sink faucets, home appliances, and furniture. For this reason, there is a lot of stainless-steel pieces that end up in the garbage as scrap metal.
Step 2: Analyzing the Materials
Once Hugo chooses the good pieces of scrap metal, he brings them back to his shop to be transformed. He first cleans each piece by hand and then analyzes the best way to move forward with each piece. He tries to maintain the true shape so that there is as little waste as possible. Since the jewelry turnout depends on the shape of the material at hand, each piece ends up unique. For example, rings are generally made with tubing and earrings are usually made with thick sheet metal.
Step 3: Designing
This is where it gets fun! Hugo sits down with his pen and paper and gets creative with some design ideas. He tries to make pieces that are bold and unique, stepping away from concepts that are too mainstream. He wants to create timeless pieces that can last a lifetime. Each piece is created to be one of a kind as he doesn’t follow any specific pattern.
Step 4: Getting to Work
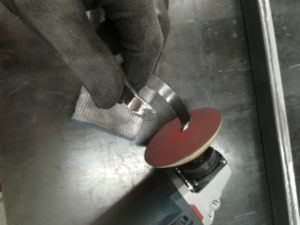
Hugo uses four main tools – a hammer, saw, sander, and polisher. Once the materials are cleaned and the concepts and designs have been thought through, he gets to work in his shop. Firstly, Hugo uses an electric saw to cut the steel into the shapes he wants. Since jewelry is very small, he then uses pliers to cut the specific shape and go into more detail with the design. He will then add some texture using a hammer which creates ripples on the metal. Afterwards, Hugo uses three different types of electric sanding disks to sand down any imperfections. Lastly, he makes holes in pieces such as necklace pendants and earrings before attaching the chain or earring hooks. The last step is to polish and add a protective spray for the perfect shine!
If you’re interested in getting into the art of jewelry making, Hugo suggests starting simple and moving to more complex projects as you learn. This blog includes the steps Hugo takes to design jewelry with metals but there are many videos and tutorials out there as well to get you started! Along with metal jewelry, there are plenty of other types of jewelry you can make if you don’t have a shop or equipment!
Sustainable Creativity

Now more than ever, it is important to pay attention to the impact you have as an individual. Your own ecological footprint may seem insignificant but when adding all the individual footprints, even in just one city, the impact grows immensely. Put simply, an ecological footprint is a measure of human impact on nature which considers aspects such as housing, transportation, and energy consumption. The ecological footprint of Canada is approximately 8.17 hectares, one of the highest countries in the world. This means that if everyone lived like us, we would need over 8 more planets to sustain us.
It is important to think of the individual impact you have in all areas of your life, even with your creative endeavours! Whatever kind of creative projects you are working on, try to keep in mind the impact you are making within your activity, the materials you use, and the measures you take for your creations.
Obtaining Sustainability
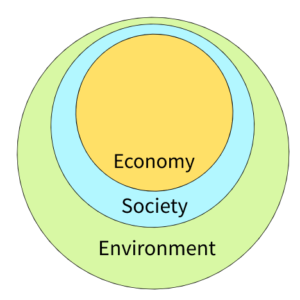 Sustainability encompasses three main categories: economy, environment, and society. Each of these categories is crucial to obtaining a balanced and healthy network of interconnecting pieces. In the past, they were seen as three separate ‘pillars’ but it is now known that they are all encompassing. Environment encompasses both economy and society as without a healthy and livable environment, the other two simply cannot exist. Society it next, because without healthy social aspects, economies would collapse. Lastly, economy is in the center as the other two do not necessarily need economy to survive and have proven so in the past.
Whether you are cooking, painting, composing music, or designing – always keep in mind this encompassing vision of sustainability into your own lifestyle and creativity. Whatever the size of your project, sustainability can play a role. With the knowledge of this circled around our community, it is fairly easy to live and create in a sustainable way. Listed below are some tips to help you on your way.
Tips for Sustainability:
- Buy ethically made products
Pay close attention to where products are made and do research on companies and businesses before hand. It is easy to find information on the sustainability of a company on the internet. Check out the factory and workplace information, ethical recognized certifications such as fair trade and B-Corp, as well as material sourcing information.
- Ecological Footprint
Paying attention to your ecological footprint encompasses many things as a means to become more sustainable. Try to focus on things such as how you get your products, where they come from, and what ingredients are inside. When considering your energy consumption, try to always unplug anything from power sockets and turn off lights to conserve energy.
When considering your carbon footprint, remember that driving spends more carbon than taking public transportation. Also note that buying good from overseas also spends more carbon than purchasing from your own country.
- Reduce, Reuse, Recycle
There are plenty of products out there that end up in second-hand stores. Why not browse the aisles here for items and material that can be repurposed for your own projects? Not only are you taking a step towards environmental consciousness, but the items are generally going to be a lot cheaper than buying brand new!
- Go Eco Friendly

When creating something, try to think of the future for the product. Is it biodegradable or will it end up in the landfill? Is it organic or full of toxic matter? When making the decision to step away from environmentally harmful products and materials, you are not only making the decision to care for the planet but also care for the people wearing/purchasing your products.
- Shop local
Shopping local is a perfect example to encompass all sustainable categories. By purchasing local products, you are helping the environment by means of reducing carbon outputs from shipping. Socially, you are helping your local community and small businesses that will be grateful for your service rather than big box stores. Economically, you are putting money back into your own community and therefore helping the local economy.
Sustainable Future
Whether small changes or big changes, taking the steps to become more sustainable is an important piece to caring for the future of our planet and our communities. There are plenty more ways to reduce your impact and step towards sustainable creativity. All it takes is a little extra research and mindfulness to create something that is low impact and environmentally friendly!
If you are looking for a little extra inspiration, we have some amazing sustainable creatives here with Maker Faire Saskatoon! So far on the blog, we have spotlighted a couple Makers who are setting the stage for sustainable creativity. Amanda Bosiak makes handmade soaps in her house focusing on natural products such as essential oils. Hugo Jamain makes handmade jewelry from recycled materials in his shop that would otherwise end up in the landfill!
If you are interested in learning what your ecological footprint is, take the test here!
Maker Spotlight: Nicole Boczula

Saskatoon Maker, Nicole Boczula, is a passionate creative, interested in a variety of artistic fields. She grew up in Calgary, studied in Toronto, and later moved to Saskatoon where she has become a local Maker! After finishing her bachelor’s degree in science, she realized that she was always turning to creative outlets and decided to follow her passion as an artist instead.
Nicole currently works at Painfully Pretty Tattoo Studio in Saskatoon as a Tattoo Apprentice. She is happy to have the freedom with this job and to have the ability to create every day! In Nicole’s free time she explores other creative activities, taking a special interest in cosplay. Other than cosplay, Nicole keeps busy with aerial hoop classes, music, and crafting. Being a Maker has allowed Nicole to hone in on her artistic passions and talent for creating new things. She believes that “everyone has the ability to create and show the world what they can do – whether you are a makeup artist, cake decorator, or engineer”!
Nicole’s Designs

For those of you are new to this term, cosplay is a portmanteau of the words costume and play. Cosplay originated in Japan but has since become a globally recognized community. Not only does cosplay offer a new imaginative space but it has also created an amazing sense of belonging for those interested in this area. There are conventions and expos held around the world, whether they are small local gatherings or massive events in major cities. If cosplay attendees feel up for a friendly competition, some of the conventions and expos allow for costumes to be judged based on construction and presentation – and the opportunity to win a prize!
Nicole loves the cosplay world and creating her own costumes for events, photoshoots, and online. Local cosplayers might recognize her online name as ‘Simply Devious Cosplay’. She has been a cosplayer for approximately 8 years now and designs all of her own costumes! Nicole feels inspired by the cosplay scene because she loves to be able to transform into characters that she admires. She also loves to attend in-person events as it is a great opportunity to connect with other cosplayers and fans within the community. The events are a great way to “interact with others and gives cosplayers the opportunity to talk about their favorite characters from the same show/videogame.” Nicole states that she has made many lifelong friends that she met through conventions and expos.
Nicole currently has a few different projects on the go, focusing on props and armor, including the Cloud Buster Sword from Final Fantasy 7! When creating new things, she gathers a collection of photos for inspiration. She then cuts out the design she wants from EVA foam or insulation foam. From here, she begins sanding and priming in order to prep for finishing. The last step is where she gets creative with paints, colours, looks, and designs!
Cosplay Community in Saskatoon
 Saskatchewan has a great cosplay community, with events held every year in Saskatoon! Anyone interested in cosplay is accepted into this space where artists get to show their talents for costume design. Those in this community are very passionate about the art and design that goes into creating the costumes. Hours, days, or even weeks are spent in the process to create an amazing final costume. The events are a great way to showcase the hard-work and passion that goes into making the costume. With in-person events being put on pause, there are now many virtual events being held around the globe! If you’re interested in cosplay, take a look at some of the expos offered and get back into your creative sphere!
If you’re new to cosplay but are interested in the scene, take a look online for countless workshops available to get you started! Youtube, Instagram, and other social platforms are also a great way to connect with this community as well as showcasing your own creations! A friendly tip from Nicole is to get inspiration from pictures/videos of other cosplayers in the community. She also recommends starting small, stating “I know when I first got into cosplay, I would be super ambitious (which is great!), but I would get overwhelmed with the sizes of the projects I took on. Do not feel like you need to craft every individual piece of your costume or prop.”
In past years, the Maker Faire Saskatoon has had a ‘Cosplay Corner’ that shows off the thriving cosplay scene in Saskatchewan! With workshops ran by passionate, local cosplayers, guests are invited to try their hand at making capes, masks, armor, and more! It’s a great way for newcomers that are interested to see how they like it! Let’s cross our fingers for a booming ‘Cosplay Corner’ at future Maker Faire events in Saskatoon!
If you want to take a look at more designs from cosplayer, Nicole Boczula, take a look at her Instagram here!
If you are interested in Nicole’s tattoo designs, check out her other page here!
Maker Spotlight: John Demchenko

 In the past few weeks, we have showcased a variety of new Makers. This week we are introducing local musician, John Demchenko. John is passionate about music and has been making electronic music out of his home studio, under the name of ‘Allegorical Shadows’. He has always been interested in the musical world and has been learning and creating his own music for approximately ten years! John is a Maker because he loves creating things and having the ability to connect with other Makers within the community. He states that “being able to express one’s creativity is something you can’t really measure, but it is a very satisfying experience”.
Other than electronic music, John has taken an interest in a wide variety of other music genres. With his music education and skills, he now has a deeper appreciation for all music industries as he now knows the effort it takes to bring a piece to life.
Workshops
Along with creating his own music, John is also interested in helping other along their musical journeys. He mainly focuses on helping people beginning into the electronic music sector. John will be showcasing an online workshop “Getting Started with Electronic Music”, posted on our page at a later date. John believes that electronic music is a great start for people who are musically interested but may not have the space or the budget to afford expensive instruments.
Getting Started
 John has a few helpful tips for those of you interested in getting started with electronic music. Firstly, you will need to have access to a computer or smartphone and able to download a free software. John suggests not to fret if you have never learned an instrument before as “with technology today you can pretty much create any kind of music you like using virtual instruments”. In the beginning, you’ll want to start off with the basics and to allow yourself time to learn and develop skills at your own pace. The internet is a great place to learn, especially with platforms such as YouTube. You can look up any lessons you are keen to learn and at any level as well! If you are more serious about the art of electronic music, there are plenty of online course available which will allow you to learn more technique and allow you to expand your skills. Most of the softwares allow you to change and edit along the way as part of the learning process.
If you want to see more from John, check out his Facebook page here and his SoundCloud channel here!
101 Tutorial: Soap Making

A few weeks ago, we introduced Amanda Bosiak, a local soap maker and owner of the brand Pithy and Practical. She creates hot process soaps using a slow cooker, and this week she wants to share some tips if you want to try your hand at soap making!
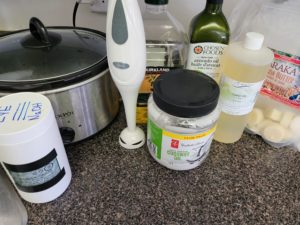
There are a few tools you’ll need before you begin, listed below 
- Slow cooker
- Immersion blender
- Kitchen scale
- Loaf mold
- Vinegar
- pH testing strips
- measuring cups, spatula, mixing bowls
Ingredients
- Saponifiable oils and butters
- Sodium Hydroxide (Lye)
- Distilled water
- Optional: essential oils, powdered colourant, plain Greek yogurt/sodium lactate
To make your own soap, you’ll first need to find a recipe to follow which Amanda says you can find on Pinterest! You’ll also need to find a lye calculator which will tell you exactly how much lye you need to use based on the amount of oils you have. The lye amount will also vary based on the type of oils you are using. You’ll also need to make sure that you are calculating for hot press soap and not cold press soap. We’ve saved you some time with a recipe you can follow below!
Recipe
The recipe should include 40% water and 5% super fat. There needs to be quite a bit more water content when taking hot process soaps because as it heats up the water evaporates. So, you’ll need to add more water because you’ll want to keep it as pliable as possible. Superfatting the soap allows it to be softer in the end! Here is the recipe that Amanda works with:
| 135g | Avocado oil |
| 45g | Castor oil |
| 135 | Cocoa butter |
| 225g | Coconut oil |
| 90g | Olive oil |
| 225g | Shea butter |
| 360g | Water |
| 123 g | Sodium Hydroxide (NaOH) |
| 37g | Fragrance (*optional) |
| 45g | Superfat 5% – Shea Butter |
| (note: solid oils make the best superfats) |
Step by step process to making soap
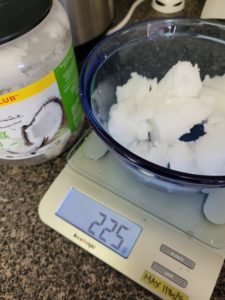
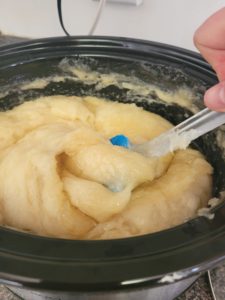
Step 1: Add liquid oils and then add solid oils after microwaving
Step 2: Add lye solution with sodium lactate or plain Greek yogurt
Step 3: Cook in crockpot at low heat, covering half with plastic wrap
Step 4: Use the immersion blender, carefully mixing on low power for 10 second increments until it thickens
Step 5: Fully cover with both the plastic wrap and lid. Let cook for 45 minutes to 1.5 hours, checking on it every 10 minutes or so
Step 6: Check the pH level by taking a tsp of the soap and adding it to quarter cup of distilled water. Test with the pH strip and it should read 10pH.
Step 7: Once the mixture is ready, leave it to sit with the slow cooker turned off. During this time, melt down the super fat and add any essential oils and colourants you want for the final product. Once it’s finished, add the mixture to the soap in the slow cooker. Stir until it’s evenly distributed.
Step 8: Add mixture to loaf and decorate the top however you want. As the mixture cools, it begins the saponification process to turn into soap. It takes between 24-48 hours until you can unmold, cut, and cure.
 Painted Mason Jars / Flower Vases
 Nature Clay Impressions

 3. Reusable bags
 Sustainable Focus
 The Zero-Waste Process
 5. Bracelets
 Step 1: Finding the Materials